 Ring made with process described to right using 2D graphics. Ring made with process described to right using 2D graphics.
Early CAD Daze
I remember some of my own first efforts at using digital technology in my design and manufacturing. Integrating digital design, and a very primitive form of 3D Printing was not a simple process back then... Using a graphic design application called Corel Draw (which I still use for some things) I would create a 2-D design. I then printed the design on clear film as a negative image using a laser printer. Using this negative to control the exposure of a sheet of light-sensitive polymer the film was simply placed over the polymer prior to putting it in a UV light box. Where light was not blocked from the laser print, it cured the polymer, making it harder and resistant to water. The uncured part of the image was water-soluble, and I could etch the exposed image with water and gentle rubbing with a toothbrush. I would then cut the etched design away from the sheet using a jeweler’s saw, smooth the edges and make a mold, vulcanizing the new object between layers of natural rubber. The next step would be to cut the etched sheet out of the mold with a scalpel and using hot wax under pressure, inject wax into the space made by the etched design. At that point I have a positive 3-dimensional positive of my design element. Finding a voice, a new voice perhaps, with Rhino provided a whole new approach to the design process. It was in the beginning intimidating in many of the same ways that learning a new language can be. It is difficult for someone that is very fluent in their native language (wax carving maybe? Fabrication?) to accept the fact that for some time during the process of adapting a new language that they will communicate like a 3 yr. old…at best! And I took a road that was, in its implementation perhaps more difficult, but I felt the rewards would be greater. There are many jewelry-specific design applications that make the design process easier but may ultimately make it harder to find a unique voice in that they compel one to use the same pre-forms in creating a design, the same algorithms that everyone else using that application is using. For the same reason that I refused to look in jewelry store windows when I began my design career, I chose a bare-bones design application, Rhinoceros, which allowed me to find my way without necessarily walking down a well-worn jewelry path! I was lucky in that once I embrace the CAD process, I was able to integrate it into my design schedule a little at a time, using it first to make the simplest objects, ones that did not necessarily require much of a “voice”. A simple band, for example, with a phrase, a signet ring with an established design on one surface… As time has progressed, with many more hours invested into the CAD experience I am extremely delighted to find that not only have I have found my voice within this new language of CAD, I am now able to help others along their digital design path. My "thing" as an instructor, is that with nearly 50 years of designing, manufacturing, and repairing jewelry, I'm quite keen on passing along the skills it takes to generate digital designs that can realistically be produced, and will endure, not just aesthetically, but endure the rigors of the wear to which an heirloom-class jewelry item is subjected. I keep "Manufacturing in Mind" in my instruction! |
|
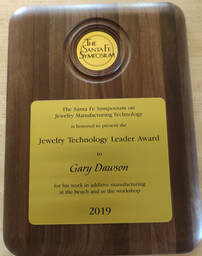
It was with surprise and delight that, at the recent 24th Santa Fe Symposium on Jewelry Manufacturing Technology I received an award for Technical Leadership, providing a high level of validation for my CAD efforts.
AND...I also do a podcast and blog on Substack!! You can sign up for it here!